
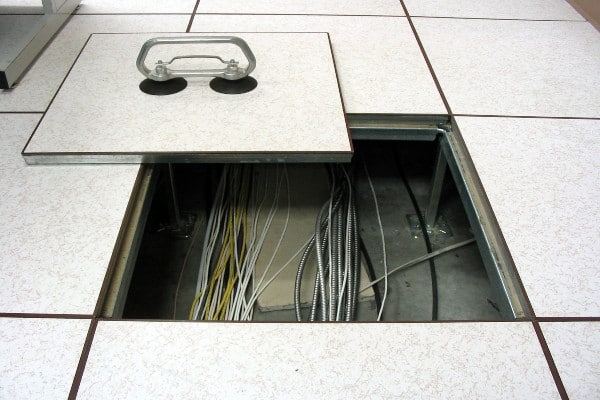
Raised access floors have been used in offices, data centers, computer rooms, and commercial buildings for decades. They provide flexible access to electrical wiring, networking systems, communications equipment, and air-distribution systems.
Over time, individual floor panels may require replacement because of age, wear, water damage, cracking, warping, corrosion, or high-pressure laminate delamination.
This guide explains how to identify, remove, match, and install replacement raised floor panels while protecting the surrounding floor and understructure.
Step 1: Identify the Problem
Before beginning the replacement process, inspect the damaged panel and the surrounding area. Determine whether the problem is limited to the panel or whether the pedestal, stringer, gasket, finish, or another part of the understructure is also damaged.
Common reasons for replacing a raised floor panel include:
- Cracks, breaks, or damaged corners
- Warping or excessive deflection
- Water damage or corrosion
- Loose or damaged edges
- High-pressure laminate delamination
- Permanent staining or finish damage
- Panel incompatibility after a previous renovation
Identifying the cause of the problem helps determine whether one panel, multiple panels, or part of the supporting system must be repaired.
Step 2: Prepare the Work Area
Create a safe and accessible workspace around the panel being replaced. Remove furniture, equipment, stored materials, and other obstructions before lifting the panel.
If the panel supports equipment, confirm that the equipment can be safely moved or supported before removing the panel. Never place personnel or equipment over an open floor cavity.
If electrical, data, or mechanical services are exposed beneath the panel, coordinate the work with qualified facility personnel and the appropriate licensed trades.
Step 3: Remove the Existing Raised Floor Panel
Use an appropriate raised-floor panel lifter or the removal method recommended by the manufacturer. Do not pry panels out with makeshift tools, screwdrivers, pry bars, or other equipment that could damage neighboring panels or the understructure.
Lift the panel vertically and carefully. Avoid dragging it across adjacent panels, pedestal heads, stringers, cables, or floor finishes.
If the system uses corner locks, screws, or mechanical fasteners, remove them with the correct tool before lifting the panel.
Step 4: Inspect the Understructure
After removing the panel, inspect the opening and supporting components. Check the pedestal head, pedestal shaft, base plate, stringers, fasteners, gaskets, and surrounding slab for damage or movement.
Look for:
- Loose or displaced pedestals
- Missing or damaged stringers
- Cracked welds or broken fasteners
- Corrosion or water damage
- Debris beneath the panel
- Pinched, damaged, or unsupported cables
- Uneven or unstable support conditions
Do not install a new panel until the supporting structure is stable, clean, properly aligned, and suitable for the expected loads.
Step 5: Obtain the Correct Replacement Panel
Replacement raised floor panels are not universally interchangeable. Even panels with similar dimensions may have different thicknesses, edge details, underside construction, load ratings, finishes, or pedestal requirements.
Before ordering, document:
- Panel length and width
- Panel thickness
- Panel construction and material
- Finish and floor covering
- Corner and edge configuration
- Underside pattern or manufacturer markings
- Pedestal-head and stringer configuration
- Required concentrated, uniform, and rolling loads
For older or discontinued systems, provide photographs and measurements or send a physical sample when possible. Pro Access Floors can help match or refurbish existing raised floor panels when new replacement panels are no longer available.
Step 6: Install the Replacement Panel
Clean the support points and confirm that the replacement panel is free from damage before installation. Position the panel directly above the opening and lower it vertically onto the pedestals or stringers.
Align the panel with the surrounding floor so that the joints are even and the finished surface is flush. If the system uses screws, corner locks, or other fasteners, install the correct hardware according to the manufacturer’s instructions.
Avoid over-tightening fasteners, forcing panels into position, or modifying the panel without confirming that the modification is permitted by the manufacturer.
Step 7: Preserve Lateral Stability
Raised-floor systems rely on the complete panel and understructure layout for stability. Remove and replace panels using a controlled vertical motion whenever possible.
Do not remove large areas of flooring unnecessarily. When working on a stringered system, limit panel removal to the area required for the repair and avoid disturbing more than one row at a time unless the system manufacturer or qualified installer provides different instructions.
Step 8: Test the Completed Installation
After installing the replacement panel, verify that it is fully supported, stable, level, and flush with the surrounding panels. Walk carefully across the area and check for movement, rocking, excessive deflection, or unusual noise.
Confirm that:
- Panel joints are aligned
- Fasteners and corner locks are secure
- Pedestals and stringers remain stable
- Cables are not pinched beneath the panel
- Airflow openings remain unobstructed
- Equipment loads are supported appropriately
Any electrical, data, or mechanical systems affected by the work should be tested by qualified personnel before the area is returned to service.
Step 9: Clean the Area
Remove dust, debris, packaging, and loose materials from the panel surface and surrounding floor. Use cleaning products that are compatible with the floor covering and recommended by the panel or finish manufacturer.
For broader maintenance procedures, review the raised access flooring maintenance guide.
When Professional Assistance Is Recommended
Replacing one accessible panel may be straightforward, but professional assistance is recommended when the work involves structural damage, multiple unstable panels, heavy equipment, electrical services, water intrusion, or a discontinued flooring system.
A qualified raised-floor professional can help identify the existing system, verify panel compatibility, inspect the understructure, determine load requirements, and recommend the correct replacement procedure.
Conclusion
Replacing raised access floor panels is manageable when the problem is properly identified, the work area is prepared, and the replacement panel matches the existing system.
Use the correct panel-lifting tools, protect surrounding panels and services, inspect the understructure, and verify that the finished installation is stable and level.
Pro Access Floors supplies new, used, and refurbished raised floor replacement panels for a wide range of systems. With more than 25 years of experience, we can help identify compatible materials for obsolete or damaged access flooring.
To begin a replacement-panel request, complete the Raised Access Floor Replacement Panel Checklist or call 858-566-9000.